DIY Power Station Diagram A Comprehensive Guide
In today’s world, having a reliable power source is essential, especially during emergencies, outdoor adventures, or off...

In today’s world, having a reliable power source is essential, especially during emergencies, outdoor adventures, or off-grid living. Building your own DIY power station can be a cost-effective and rewarding project. A well-designed power station provides portable energy for devices, tools, and even small appliances. This article will guide you through understanding the basic components and layout of a DIY power station diagram, helping you create your own efficient and safe power solution.
Understanding the Basics of a DIY Power Station
Before diving into the diagram, it’s important to understand what a DIY power station entails. Essentially, it is a portable energy system that stores electricity and delivers it when needed. It typically includes a battery bank, charge controller, inverter, and various input/output ports. The goal is to convert stored DC power from batteries into usable AC power for your devices.
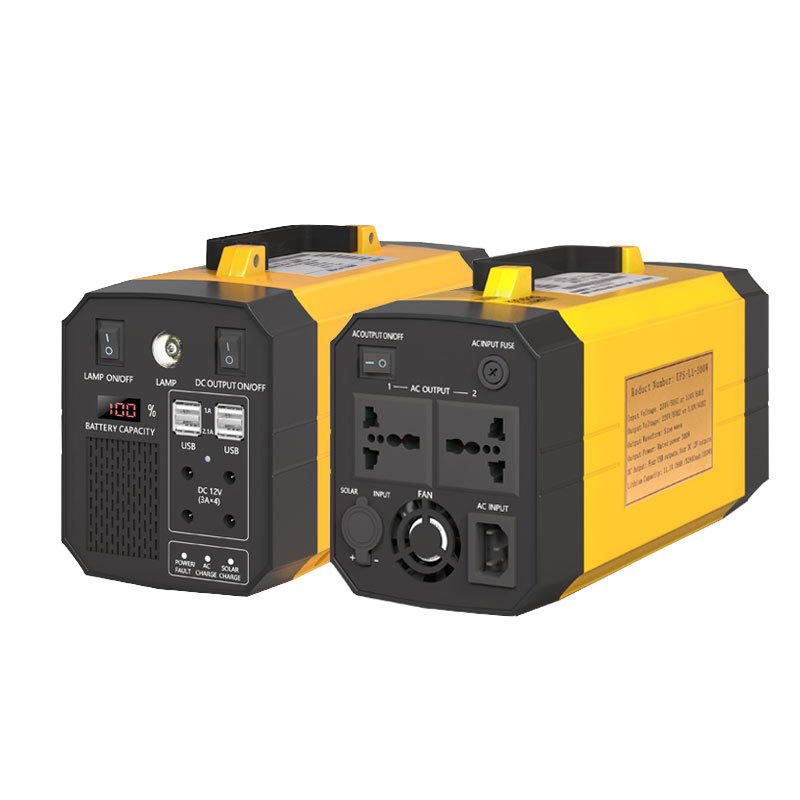
Core Components in the DIY Power Station Diagram
A clear power station diagram highlights these essential components:
Battery Bank: The heart of the system, usually composed of deep-cycle batteries like lithium-ion or lead-acid.
Charge Controller: Regulates the voltage and current coming from the solar panels or other charging sources to prevent battery damage.
Inverter: Converts DC power stored in batteries into AC power compatible with household appliances.
Solar Panels (Optional): Provide renewable energy input, charging the batteries during daylight.
Fuse/Breaker: Protects the system from overloads or short circuits.
Output Ports: Include AC outlets, USB ports, and 12V DC sockets for powering various devices.
Step-by-Step Wiring Layout
A typical DIY power station wiring diagram follows this flow:
1. Power Input: Solar panels or external charging sources feed electricity into the charge controller.
2. Charge Controller: Monitors and controls the energy flow to the battery bank.
Battery Bank: Stores the electrical energy safely.
Inverter Connection: Draws DC power from the battery and converts it to AC.
5. Output Distribution: Provides power to connected devices through various output ports.
6. Safety Devices: Fuses and breakers are installed between components to ensure protection.
Choosing the Right Battery Configuration
Battery configuration affects the voltage and capacity of your power station. You can wire batteries in:
Series: Increases voltage (e.g., combining two 12V batteries to get 24V).
Parallel: Increases capacity (amp-hours) while keeping voltage constant.
Series-Parallel: Combines both methods to achieve desired voltage and capacity.
Your diagram should clearly indicate these connections to avoid confusion and ensure proper operation.
Incorporating Safety Measures
Safety is paramount when building a DIY power station. The diagram must include:
Fuses and Circuit Breakers: Positioned close to batteries and charge controllers.
Proper Cable Sizing: To handle the current load without overheating.
Disconnect Switches: For maintenance and emergency shutdown.
Ventilation: Batteries, especially lead-acid, need proper ventilation to prevent gas buildup.
Integrating Solar Panels and Other Charging Sources
If you use solar panels, the diagram should show how they connect to the charge controller and then to the battery bank. You can also incorporate other charging methods like:
AC Wall Charger: For charging from a standard outlet.
Car Charger: Useful for charging on the go.
The diagram should clearly specify input ports for each source.
Output Options and Load Management
Your power station diagram should include various output options tailored to your needs:
AC Outlets: For household devices like laptops or lights.
USB Ports: For smartphones and small electronics.
V DC Ports: For camping equipment or automotive accessories.
Load management tips can also be included to optimize battery life and prevent overload.
Tools and Materials Needed
An effective DIY power station diagram also assists in preparing the materials and tools list, including:
Batteries, charge controller, inverter, solar panels.
Wiring, connectors, fuses, switches.
Multimeter, wire stripper, screwdriver, and safety gear.
Building a DIY power station requires careful planning and understanding of the electrical components involved. A well-crafted DIY power station diagram serves as a roadmap, ensuring proper connections, safety, and efficiency. By following the steps outlined above, you can create a reliable portable power source tailored to your specific needs. Whether for emergency preparedness, camping, or off-grid living, a DIY power station is a valuable project that combines practicality with technical skill. Always prioritize safety and consult professional resources if unsure during the build process.
Related Content
- Allpowers 2000W Portable Solar Power Station Ultimate Off-Grid Energy Solution
- Coal Power Stations An In-Depth Overview
- Amazon Power Station with Solar Pads The Ultimate Portable Energy Solution
- Marbero Portable Power Station Manual A Comprehensive Guide
- Allpowers Portable Power Station Review A Reliable Power Solution for On-the-Go Needs
- Battersea Power Station Development Company A Pioneering Vision for Urban Renewal
- Best Portable Power Station with Inverter Your Ultimate Guide
- Portable Power Station for Sale Your Ultimate Guide to Choosing the Best
- Battersea Power Station Project Overview
- Outdoor Power Station with Explosion-Proof Valve A Comprehensive Guide